
PF Tek Explained: A Comprehensive Mushroom Growing Tutorial
Posted by Jmaequiogue on Jul 31st 2024
Growing mushrooms at home can be a rewarding and educational experience. One of the most popular methods for beginners is the PF Tek (Psilocybe Fanaticus Technique) method, which uses jars to cultivate mushrooms. This guide will walk you through the PF Tek process, providing detailed instructions and highlighting Mycelium Outlet as your go-to supplier for all necessary materials.
What is PF Tek?
PF Tek, developed by Robert McPherson (aka Psilocybe Fanaticus), is a simple and effective technique for growing mushrooms using readily available materials. This method is particularly favored by beginners because it minimizes contamination risk and doesn't require sophisticated equipment. The process involves creating a nutrient-rich substrate in jars, inoculating it with spores, and providing the right conditions for the mushrooms to grow.
Materials Needed
Before you start, gather the following materials, all available at Mycelium Outlet:
- Wide-mouth half-pint jars
- Brown rice flour
- Vermiculite
- Water
- Mushroom spore syringe
- Aluminum foil
- Pressure cooker or large pot with a tight-fitting lid
- Micropore tape or breathable tape
- Alcohol wipes or a lighter (for sterilization)
- Gloves and a face mask (for maintaining a sterile environment)
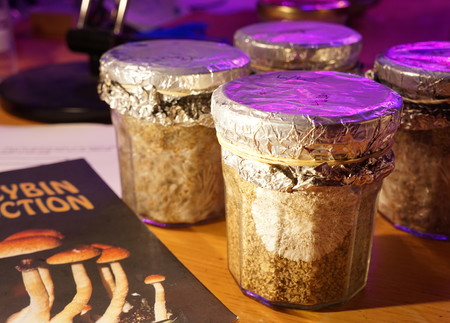
Step 1: Preparing the Substrate
The substrate is the nutrient-rich material that supports the growth of the mycelium. For PF Tek, the substrate is a mixture of brown rice flour, vermiculite, and water.
- Mix the Ingredients: In a large mixing bowl, combine 2 cups of vermiculite with 1 cup of water. Mix thoroughly until the vermiculite is evenly moistened. Add 1 cup of brown rice flour and mix again until you achieve an even consistency.
- Fill the Jars: Carefully fill each half-pint jar with the substrate mixture, leaving about 1/2 inch of space at the top. This space will be filled with dry vermiculite to act as a contamination barrier.
- Add the Barrier: Fill the remaining space at the top of the jars with dry vermiculite. This layer helps prevent contaminants from reaching the substrate.
- Cover the Jars: Place a layer of aluminum foil over the tops of the jars to protect them during sterilization. Make sure the foil is tight and secure.
Step 2: Sterilizing the Substrate
Sterilization is a critical step to eliminate any potential contaminants from the substrate.
- Pressure Cooker Method: Place the jars in a pressure cooker, ensuring they are elevated above the water level using a rack or jar rings. Add water to the pressure cooker (about 1-2 inches). Secure the lid and heat until the pressure reaches 15 PSI. Maintain this pressure for 45-60 minutes.
- Boiling Method: If you don't have a pressure cooker, you can use a large pot with a tight-fitting lid. Place the jars in the pot, elevate them above the water level, and add water. Bring to a boil, then reduce to a simmer and cover. Let the jars steam for 90 minutes.
- Cool Down: Allow the jars to cool completely (preferably overnight) before proceeding to the next step.
Step 3: Inoculating the Jars
Inoculation is the process of introducing mushroom spores to the substrate. This step must be done in a sterile environment to prevent contamination.
- Prepare the Area: Clean your work area thoroughly with disinfectant. Wear gloves and a face mask to minimize contamination risk. Use alcohol wipes to sterilize the spore syringe needle or flame sterilize it with a lighter.
- Inject the Spores: Remove the aluminum foil from the jars. Inject approximately 0.25-0.5 ml of spore solution into each jar through four evenly spaced holes near the edges of the lid. Ensure the needle penetrates the dry vermiculite layer and reaches the substrate. Cover the holes with micropore tape or breathable tape.
- Incubate: Place the inoculated jars in a warm, dark place with a stable temperature of 70-75°F (21-24°C). Mycelium Outlet offers incubation chambers and heating mats to help maintain optimal conditions.
Step 4: Colonization
During the colonization phase, the spores will germinate and the mycelium will spread throughout the substrate.
- Monitoring: Check the jars periodically for signs of mycelium growth. Within 1-2 weeks, you should see white, thread-like mycelium spreading from the inoculation points.
- Contamination Check: Be vigilant for signs of contamination, such as green, black, or other colored molds. If contamination is detected, remove the affected jars immediately to prevent it from spreading.
- Full Colonization: Wait for the substrate to become fully colonized, with the mycelium covering the entire surface. This usually takes 3-4 weeks.
Step 5: Fruiting
Once the substrate is fully colonized, it's time to encourage fruiting, the stage where mushrooms begin to form.
- Preparation: Carefully remove the fully colonized cakes from the jars. Rinse each cake under cold water to remove any loose vermiculite.
- Dunk and Roll: Submerge the cakes in cold water for 12-24 hours to rehydrate them. After soaking, roll the cakes in dry vermiculite to create a humidity-retaining layer.
- Fruiting Chamber: Place the cakes in a fruiting chamber with high humidity (85-95%) and good air exchange. Mist the cakes and fan the chamber several times a day to maintain these conditions. Mycelium Outlet offers a range of fruiting chambers and misting systems to help you create the perfect environment.
- Pinning and Growth: Within a week, you should see small pins (baby mushrooms) forming on the cakes. These will grow into mature mushrooms over the next 1-2 weeks. Continue to maintain high humidity and fresh air exchange during this period.
Step 6: Harvesting
When the mushrooms have reached their desired size, it's time to harvest.
- Harvest Time: Harvest the mushrooms when the caps have fully expanded but before the gills start to release spores. Gently twist and pull the mushrooms from the cakes.
- Multiple Flushes: After harvesting, the cakes can often produce additional flushes of mushrooms. Rehydrate the cakes by dunking them in water for a few hours and placing them back in the fruiting chamber.
Troubleshooting Common Issues
Even with careful preparation, you may encounter challenges during the PF Tek process. Here are some common issues and solutions:
- Contamination: Use sterile techniques and high-quality spores from High Desert Spores to minimize contamination risk.
- Slow Growth: Ensure the incubation temperature is within the optimal range and the substrate is adequately hydrated.
- Poor Fruiting: Maintain high humidity and fresh air exchange in the fruiting chamber. Use our misting systems and hygrometers to monitor and adjust conditions.
Why Choose Mycelium Outlet?

Mycelium Outlet is your trusted source for all mushroom growing supplies and expertise. We offer:
- High-quality spore syringes – High Desert Spores
- Sterilized substrates and jars
- Incubation and fruiting equipment
- Detailed guides and customer support
Our commitment to quality and customer satisfaction ensures you have everything you need for successful mushroom cultivation using the PF Tek method.
Conclusion
The PF Tek method is a beginner-friendly and effective way to grow mushrooms at home. By following these steps and using high-quality supplies from Mycelium Outlet, you can enjoy the rewarding experience of mushroom cultivation. Visit Mycelium Outlet today to get started on your mushroom growing journey!